Deadlifter14

Deadlifter14
I'm a Dork
Showing posts with label Hobby Stuff. Show all posts

Sunday, March 18, 2012

Next Model

This is going on the second terrain board I am building. It is a rock spire. Again step by step photos to show the process of how I am transforming simple objects into different model scenery.

Here is the basic foundation...


Once the glue dried I started to carve the basic shape. This is a picture from about half way through the process.


The goal here is to make the little pieces of foam insulation appear less like little pieces of foam insulation and more like rock.

This next picture is after a coat of base paint, a medium grey applied all over. This process took a while getting in all the nooks and crannies. If I had to do over again I would of prepped the foam to take paint better and went over it with a white paint instead and washed it over and over again with shades of paint but hindsight is 20/20.


 This next picture shows the model after some layers of dry brushing.


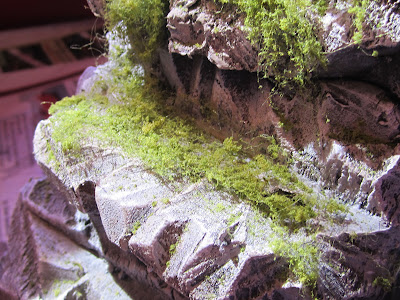
The next step is to add some foliage material. Here is a close up on some vine like material I added to the model. It is not glued down yet so it appears a bit "fluffier" then it will at the end.


I am still working on finishing the overall drybrushing. Real rocks and cliffs have a multitude of browns, greys, reds, and greens and I am working in various colors while keeping it dominantly grey. Hopefully by tonight I can post up completed pictures. I will also update the current training logs and post up some other odds and ends. 


Sunday, March 4, 2012

Updated Model Pics

Well I have worked on the board section and gotten a lot done. I am going to post some step by step pictures so you can see how it was done. The base material is foam insulation (commonly blue or pink but in this case I got the lowes brand which was in green). I used the 3/4 inch size which seems to be ideal at deviations are at about model height but slightly less for a 28mm model. The first this I had to do was cut out a 2 foot by 2 foot square (the sheet comes in a 8 foot by 4 foot section). I did this using a 2 foot by 2 foot piece of pine plywood as a guide and cut the sheet with a retractable hobby knife. I did this by cutting along the board edge about half way down and then snapping it apart. This meant that I had to cut off a 2 foot by 4 foot section and then cut that in half. This produced a nice clean cut. I don't have any pictures of this stage so I will use a stock photo from the web.


Once I cut out the basic 2 foot by 2 foot section I had to think up what I wanted on this particular board. I would be combining it with 7 other sections to make a full game table of 8 foot by 4 foot. I had the general idea in my mind of what I wanted it to look like and I sketched it out on a piece of paper. I then made a computer drawing in photo shop.

In order to accomplish this I had to cut out the hill that would be in the corner. I cut this from the same insulation board that I cut the 2 foot by 2 foot section and then glued this to that section. Since there were no river section or other type of depression that pretty much took care of any designing I had to do on the board. Again I don't have a picture of this step so I am using one from the internet to give you a general idea.


The gives a basic idea. From here I had to provide some kind of texture to the board to make it appear less like a piece of Styrofoam and more like a landscape. Since I still wanted a relatively flat surface for models to sit upon I used paint mixed with sand. This provides some texture but still allows models to stand upright. If I was building a static scene like a model railroad layout I would use modeling clay or plaster to made a more realistic landscape but for this I wanted something that balanced between looking good and being functional. This is a picture of the board section while the paint was still wet.


The rest of the pictures are different progressions on how I painted and then dry brushed things. The hill was first painted over with a medium gray. Over top of this I threw on a black wash. I then went back and drybrushed medium gray and followed up with progressively lighter shades of gray all the way to a very light dusting of white. The dirt areas was done with raw sienna and then dry brushed with a mix of raw sienna and yellow ochre. I then dry brushed yellow ochre and finally hit it with a very light dusting of a bright yellow. I then applied various kinds of ground foliage from woodland scenics to give a grass and bushes affect.


The board is basically done. I am going to apply some trees and the one off shoot on the dirt trail that leads to an open spot is going to house a cottage.

Friday, March 2, 2012

New Model I am Working On

I have decided to start including some entries about different hobbies I am involved in. One of those hobbies is modeling miniature terrain scenes. Think sort of like model railroad scenery without the actual railroads. While there is nothing wrong with model trains I am just not really into them. I much prefer to model fantasy scenes. The current one I am working on is based around the Warhammer Fantasy game I have talked about before.

The basic plan is to work in 2 foot by 2 foot sections. What I do is cut out a section of insulation foam board and make my model based around that. In the end it will consist of 8 sections (meaning when combined it will be 8 foot by 4 foot).

Obviously the first order of business in building a section is to cut the foam board to shape. In order to do this I used a sharp hobby knife and cut about half way through the board using a hardwood board as a straight edge to follow. I then simply snapped the board and this produced a nice clean cut. I actually thought this would be one of the harder parts but it proved remarkably easy.

The next thing I had to do was decide what would be going on the section. For the first section I am working on I decided one corner would have a gently sloping hill. A dirt road would traverse the middle of the board and a small cottage would sit just off the main road. Other than that a few trees and perhaps a fence surrounding the cottage. Pretty simply to start off with.

With this plan in mind the next thing I had to do was cut the hill shapes that would go in the corner. I used a serrated steak knife for this which works quite well in producing a nice jagged cut like a hill side would have. I then had to attach these hills to the board itself. Most of the features on the board will be added later on but the hill had to be added now so that it would be textured like the rest of the board.

The next step was to texture the board. This was achieved by using an "earth color" (roughly raw sienna) and mixing in sand to make it textured. This is then applied liberally all over the board. After the first coat second and third coats may be applied to select spots to make subtle differences in the terrain. Once this is dry the board will be dry brushed in several different colors depending on what each area is supposed to represent. The hill will be drybrushed in several shades of gray to represent a rocky out cropping while the rest of the board will be highlighted in shades of browns, oranges, and yellows to represent dirt. After that grass, foliage, rocks, and other things can be added to add character.

At the moment I just finished applying the first layer of texture paint to the board. After this drys I will judge whether or not I want to do additional layers or go straight to highlighting.


That is a picture of the board still very wet from its initial coat of textured paint. I am pretty happy with it.